Very excited nowner of this dog. I showed her along the way WIP photos and now it is finished. I hope she will like it.
Monday, 3 October 2022
Saturday, 10 September 2022
second 2d Needle felting portrait finished
Finally this portrait is finished. It is only my second one. It was a bit of a struggle but I learned a lot.
Thursday, 1 September 2022
Friday, 26 August 2022
Sunday, 21 August 2022
second 2d needlefelting portrait.
Just startet on my second portrait. Just tiny pieces if wool and a special needle to attach the wool on a piece of 100 % woolfelt.
Still a lot of work to do. The eyes must sparkle and then ..... the fur. A real challenge.
Friday, 27 May 2022
2D Needlefelting portrait
It was time to explore other possibilities of working with wool.
This is a portrait of my darling dog, Chihuahua. His name is Mickey. When he was a puppy he had such big ears so I named him Mickey Mouse.
To make such a portrait of wool you need needlefelting wool. Sometimes only a hair at the time. So very timeconsuming. Totally different of painting portraits of animals. But in a way it is not. The fact I have a lot of experience in working with paint and pastelpencils in drawing and painting portraits I felt confident about working with colors.
I hope you like him.
Monday, 16 August 2021
New hobby: reborning babydolls
Just started a new hobby: reborning babydolls.
It is also painting but instead on canvas or paper you paint on vinyl. You buy the vinyl limbs and head en paint on the surface so you will achieve a real looking skin.
Just like with fine artpainting you bring on many, many transparant layers of a special acrylpaint. What I like about this new adventure is that I have to learn a lot of new techniques. I only work with 3 primary colors: red, blue and yellow. For the creases I add some umber to the paint mix and i use some white for the nails. That's it.
I use Ultimate Fusion paint.
Indeed a challenge. Furthermore with the finest mohair en micro feltingneedles I am going to insert hair by hair to give the head a real babylook. This doll has such a beautiful skul that I leave hem bold. But the second one will get hair.
I also love to knit, crochet and sew babyclothes. So this new hobby is so divers.
This doll is the first one I made.
Wednesday, 4 March 2020
small things for the dollhouse
This tiny baking stuff are made out of polymerclay.
They are only a couple of centimeters in size, real 1/12.
Thursday, 28 November 2019
needle felted cat
Friday, 27 September 2019
Monday, 5 August 2019
tiny book for dollhouse
It is a childrenbook 2,2 cm x 1,8 cm with 24 pages and on each page beautiful drawings.
The story is about Victoria Plum.
I want to make more for the bookcase and perhaps sell some.
Thursday, 4 July 2019
drawing of an eye
I used Bristol smooth paper, derwent sketching pencils, mechanical penils 0.5 and 0,3 mm, tortillons (often), Tombow eraser, kneading eraser.
So much fun I had.
Wednesday, 22 May 2019
Friday, 3 May 2019
Monday, 10 December 2018
MAGNOLIA FLOWER in graphite
Saturday, 6 October 2018
Wednesday, 25 April 2018
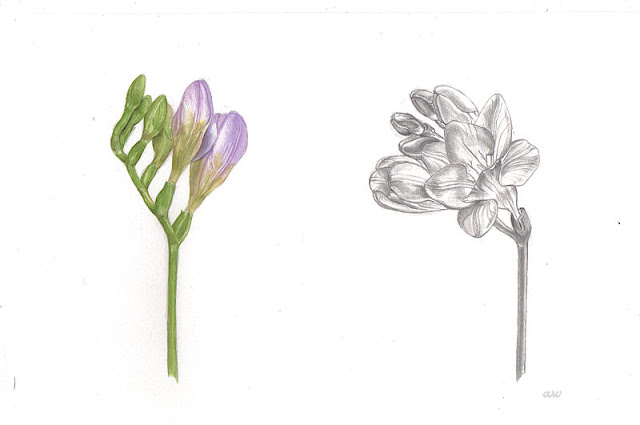
drawing and watercolor of fresia
The position of the drawing was not easy to do and I am not satisfied about the result. It would have been easier if I had choosen somewhat the same position like the watercolour painting has.
Monday, 4 December 2017
just a little feather
Only used black watercolour paint and a small size 0 paint brush on HP Arches paper.
Sunday, 12 November 2017
Artichoke aquarel
Green, green, green. So many greens with only 2 blues and 2 yellows and a tiny bit of red.
Tuesday, 7 November 2017
Primula aquarel
A great excercise in how many greens you can create by using only Ultramarine, Phatalo blue, Camboge, Winsor Red to tone the greens down en a tiny bit of Lemon for the flowers.
I used Arches HP paper and Rosemary and Co, UK brushes, most spotters.
Tuesday, 1 August 2017
Friday, 2 June 2017
Thursday, 29 December 2016
portrait of a man in graphite pencil
Very difficult to take good pictures of such a drawing. The paper is really white, a bit blueish I think. I always have to alter the photos and I always am not satisfied about the result. Of course every screen of a computer, laptop and such is different and therefor pictures are darker or lighter than at my screens.
It seems that my screens are a bit light in comparison to the ones of others.
So I place 2 pictures, in different ways altered.
Of course I like the original the most but once I gave the portrait away I only have the photo to look at. That's why I want good photos of my work.
The top one is softer, the bottom one is clearer but a bit harsh and a bit too much contrast. I do not know which one I find the best in comparison to the original drawing.
Tuesday, 16 August 2016
Tiny cyclaam drawing
The leaves and flowers are only 4 cm.
I have the plan on doing the assignments of the SBA online course on my own.
So here is the second one for the first assignment.
Tuesday, 2 August 2016
Pelarganium botanical drawing
Just finished writing the text and drew sketches and drawings for the online course.
The content of the online course is 47 pages with more than 80 pictures and 34 excercises.
It was a huge challenge.
The drawing of the Pelarganium is placed on the last page of the course.
As always: very difficult to take a scan of this drawing like this, but here it is.
Thursday, 26 May 2016
Sonchus oleraceus close up photos
But the flowers are lovely and so are the seeds flying in the wind.
I took these photos with a macro lens 90mm and my Sony a300.
For the photo of the seedball I used an umbrella and flash.
With the umbrella I covered the flash to get soft light.
Tomorrow I receive some extension tubes. I want to take even more close up/macro photos.
A real challenge but I love to experiment.
Sunday, 6 March 2016
watercolor flower
But Spring is in the air and so it is time to paint some flowers with watercolor paint.
So difficult to photograph though.
Saturday, 27 February 2016
a beautiful cock almost finished
On the first photo you see the underlayers of umber and white.
On the second photo I added color, also many layers building up depth.
Still not yet finished, the white feathers need another layer and tweaking. You still can see the underlayer of umber and white shining through. The rest of the animal is ready (I think) :-)
Monday, 28 December 2015
OILPAINTING old woman portrait black and white
The woman is suffering from Alzheimer and I was struck by her eyes.
You can see her confusion, not understanding.
I try to catch her expression with painting her in black and white. Her world is I think without colour, without details.
I hope you feel the same as I do.
This portrait is 20x15cm and painted on an MDF panel.
It took many many hours and I love to paint all those creases and folds of het skin.
A real challenge and I learned a lot.
Monday, 20 July 2015
STUDIES oilpaint after a painting of Bartner
So I took a beautiful photo of a painting of Scott E. Bartner
It is such a beautiful detailed portrait.
I took 4 canvasses of 20x20cm and transferred a drawing on them with black ink.
The first one I made it in a warm black/grey/white= Ivory black, raw umber and flake white. The three tiny highlights on the tip of the nose and in the eyes are Titianwhite. I love Flake white, it is not so harsh like Titian.
I took 3 photos of the painting process and here they are.
The first photo on top was disappointing, the white was absorbed and the picture became far too dark.
I shrubbed the paint into the canvas.
Still not satisfied. Too much oneven coloring and tones.
So I mixed a big pile of the Ivory black and Raw Umber, flake white and 7 or 8 mixes grey with it, so I would get the same mix of paint (color and tone) everywhere.
And now she is finished.
The one on the left I put as a backgroundcolor a medium tone fleshcolor on it.
The middle canvas stayed white and I used Ivory black and Titian for the first layers, still a lot of work has to be done.
The portrait on the right I put as a background color Ocre (Oker)
I added some color to the drawings but I found the colors too harsh, too much, so I mixed a very light fleshcolor with flake white and this almost transparant paint I painted it over the whole portrait to mute it a bit..
Not the background though. On the background I added some color.
THIS IS A GREAT ADVENTURE
Friday, 26 June 2015
second and third layer Old Master Technique 2 oil pantings
A lot of work to do.
Friday, 19 June 2015
underlayers of 3 little paintings "Old Master Technique"
On the painting of the Waterlily I worked 7 days and many many hours of painting only this first underlayer.
The background with the detailed leaves took very long to paint. The Waterlily has other challenges. The white and the shadows are not easy to get right
Many other underlayers will be added before I will start to ad layers of color.
Wednesday, 10 June 2015
First layer of two new oil paintings, 15x20cm
Only the first layer is added to the pieces of MDF. They both are 15x20 cm.
The color I used for these fine art painting method is raw umber and Titian white.
In the next layers, after this layer is dry, more details are added and I try to give it more depth and by adding darker color and white.
I love the color mixed with the umber and white.
It looks like an old photograph.
I want to paint the portrait of the little girl only in using the umber and white and only add in the portrait of the dog some warmer brown/reddish.
Also the white is not really white but contains a lot of color other colors, cool and warm.
A real challenge.
But I am so proud that I managed to get all the things in the right places.
The painting of the dog sofar took me 4 days of hard work, but I loved it!
old master oilpainting still life finished, overview of all the stages
It took a long time to paint this in the style of the old masters.
Monique Eysink, my very skillfull and patient teacher have learned me a lot about the proces of fine art painting.
This is the result of 30 lessons I had for 1 year and Oh boy! I learned so much in this year.
Often I had the feeling that it was too difficult to master this old master technique.
And I still have so much to learn about colour and putting layers of (transparant) colour on top of each other.
I will concentrate on that for the next year.
But for the first time I feel I finally can paint!
Not smearing oilpaint on the surface but handling the oilpaint and the brushes the right way.
I started already 2 other paintings, look at my next posts and I start another one tomorrow at my last lesson of the season.
Thanks very much!!! Monique Eysink. Till after the summer holidays. I already look forward to it.